Latin America
Arepas: Griddled Corn Cakes with Cheese Filling
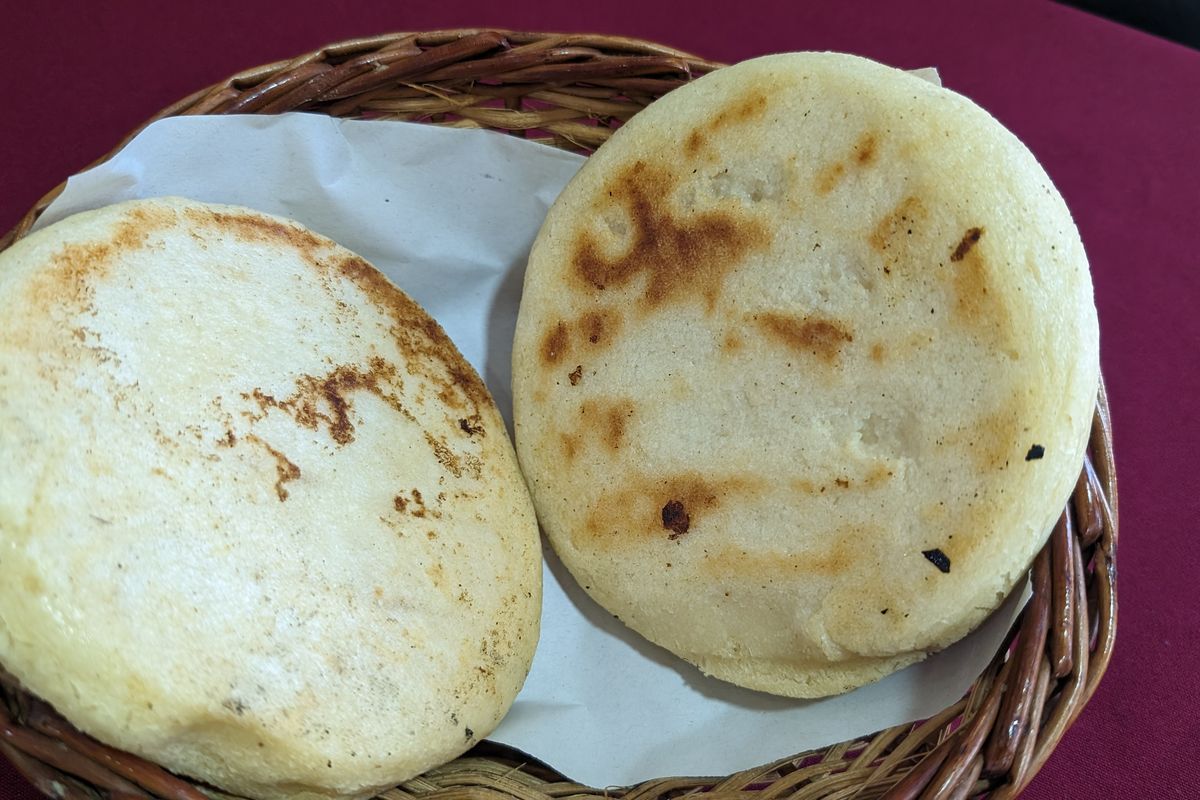
Thick corn cakes made from pre-cooked corn flour, browned on a griddle, finished in the oven and split open to hold melted cheese.
By Lavin Food Editorial · Published
- Prep
- 20 min
- Cook
- 30 min
- Total
- 50 min
- Yield
- 4 servings (8 arepas)
About this dish
An arepa is a flat, round, unleavened cake of corn dough. Wikipedia describes it as a flatbread of ground maize that may be stuffed, eaten in northern South America since pre-Columbian times, and most closely tied to the cooking of Colombia and Venezuela. It can be grilled, baked, fried, boiled or steamed. The simplest versions are split open and filled with butter or cheese, which is exactly what this recipe does.
Who made the first arepa is not settled. The article notes that no one has pinned down the country, and that estimates for the oldest evidence differ: about 3,000 years ago in what is now Colombia, and about 2,800 years ago in Venezuela. The word is said to be related to erepa, a word for cornbread in the Cumanagoto language. Today many cooks use a flour that is already cooked, a product the same source says was developed in the 1950s. It saves hours of soaking and grinding.
That flour is the key to the recipe. This version mixes it with warm water, salt and a little oil, rests the dough, browns the cakes on a griddle for a crisp crust and then finishes them in the oven so the center cooks through. The result has a thin, crunchy shell and a soft, steamy inside that is ready for a thick layer of melting cheese.
Ingredients and substitutions
Quantities are for 4 servings (8 arepas).
For the arepas
- 2 cups (250 g) pre-cooked white corn flour (masarepa), labeled for arepas
- 2 cups (480 ml) warm water, plus a little more if needed
- 1 teaspoon (6 g) fine salt
- 2 tablespoons (30 ml) neutral oil, for the dough
- 1 tablespoon (15 ml) neutral oil, for the griddle
For the filling
- 2 cups (200 g) mild white melting cheese, such as low-moisture mozzarella, shredded
- 2 tablespoons (28 g) unsalted butter, softened
- 1 medium avocado, sliced, optional
- fried eggs or shredded cooked chicken, optional, for a bigger meal
Choosing your ingredients
Masarepa is corn that was cooked, dried and ground into a fine flour. Because it is already cooked, it turns into a smooth dough with only water and salt. Look for bags labeled for arepas, usually white corn, in the international aisle or a Latin market. Wikipedia lists other names for it, including masa de arepa and harina precocida.
Do not use regular cornmeal. It is raw ground corn, and on its own it will not hold together as a dough. Do not use masa harina either, the flour sold for corn tortillas. Masa harina comes from corn that was treated in an alkaline solution, a process called nixtamalization, and then dried and ground. Masarepa is different: it is cooked in water, then dried, and it is not nixtamalized. The two taste and handle differently, so swapping them gives crumbly cakes with the wrong flavor.
The amount of water matters more than any other detail. This dough starts at roughly equal parts flour and water by volume and thickens as the flour drinks. Brands differ a little, so keep a few extra spoonfuls of warm water nearby. Warm water, not hot, helps the flour soak evenly.
For the filling, pick a cheese that melts and tastes mild. Low-moisture mozzarella is easy to find and stretches well. Some cooks prefer a white cheese from a Latin market, such as a firm, salty fresh cheese, which can be sliced or crumbled. Wikipedia mentions white cheese, sometimes mixed with feta, as a common partner for arepas.
Possible substitutions
- Masarepa: No true substitute. Regular cornmeal and masa harina will not give the same dough. Order a bag labeled for arepas.
- Mozzarella: Monterey Jack, mild white cheddar or queso fresco. Fresh cheeses melt less, so crumble or slice thinly.
- Neutral oil in the dough: Melted butter, for a richer flavor and softer crumb.
- Unsalted butter: Use salted butter and cut the dough salt to 3/4 teaspoon, or skip the butter and let the cheese carry the filling.
- Avocado: Black beans, shredded chicken or a fried egg all suit an arepa.
Step-by-step method
- Mix the dough. Stir the salt and the 2 tablespoons of oil into the warm water in a large bowl. Add the masarepa a little at a time, stirring as you go, so no dry pockets form. Keep stirring for about 1 minute, until the mixture looks like a thick, soft paste with no loose flour left in the bowl.
- Rest and knead. Cover the bowl and let the dough rest for 5 to 10 minutes, so the flour can absorb the water. Then knead it for 1 to 2 minutes. It should feel soft and smooth, like moist modeling clay, and hold a shape. If it cracks, knead in warm water 1 tablespoon at a time. If it sticks to your hands, add a spoonful of masarepa.
- Shape the cakes. Wet your hands lightly. Divide the dough into 8 equal portions and roll each into a smooth ball. Flatten each ball into a round about 3 1/2 inches (9 cm) wide and 3/4 inch (2 cm) thick. Smooth the edges with a damp finger. Cracks at the rim will open up during cooking, so press them closed now.
- Heat the griddle and oven. Heat the oven to 350°F (175°C) with a rack in the middle. Set a wide nonstick skillet or griddle over medium heat for 2 to 3 minutes and brush it with the tablespoon of oil. A drop of water should sizzle and vanish at once. If the pan smokes, lower the heat, because a very hot pan scorches the crust before the center warms.
- Brown both sides. Cook the arepas in batches, without crowding, for 5 to 7 minutes per side. They are ready to flip when the underside is pale gold with some darker brown spots and the cake lifts from the pan without sticking. Move the browned arepas to a baking sheet as you go. Re-oil the pan lightly between batches if it looks dry.
- Finish in the oven. Bake the arepas on the sheet for 10 to 15 minutes. They are done when the crust feels firm and they sound hollow when tapped on top. A cake that still sounds dull and feels soft in the middle needs a few more minutes. Let them rest for 2 to 3 minutes so the steam settles and they are easier to slice.
- Split and fill. Use a serrated knife to cut each arepa open along the edge, stopping before the far side so it stays hinged. Spread the inside with a little butter and pack in the cheese. The heat of the arepa softens the cheese in about 1 to 2 minutes. If it stays firm, return the filled arepas to the oven for 2 to 3 minutes. Serve warm.
Variations
Arepas change by region and by cook. Wikipedia describes fried versions served with white cheese and fried eggs, sweet fried arepas made with raw cane sugar and anise, and a Caribbean Colombian breakfast arepa that is split, stuffed with a raw egg and fried. For a home version, fry the shaped cakes in about 1/2 inch (1.2 cm) of oil at 350°F (175°C) for 4 to 5 minutes per side until deep golden, then bake 5 to 8 minutes to cook the center. Drain them on a rack and keep oil handling careful: use a heavy pan, never leave it unattended and keep a lid nearby to smother a flame.
The same dough takes other fillings. Try black beans with avocado, shredded cooked chicken with mayonnaise, or sliced ham with cheese. If you use chicken, make sure it has reached 165°F (74°C) before it goes in. For a corn-forward cake, stir a few spoonfuls of the cooked, drained kernels into the dough, but chop them finely so the cakes still hold together.
Storage and reheating
Arepas are best on the day they are made, but they keep. Let them cool, then refrigerate unfilled arepas in an airtight container within two hours of cooking. They keep for 3 to 4 days. Filled arepas with cheese or meat should go into the refrigerator within the same two hours and be eaten in the same time frame.
To freeze, wrap the cooled, unfilled arepas tightly and freeze them for up to about 3 months for the best quality. Reheat from the refrigerator or freezer in a 350°F (175°C) oven for 10 to 15 minutes, or in a skillet over medium-low heat for 4 to 5 minutes per side, until hot in the center. Microwaving makes them soft and chewy. Reheat leftovers that contain meat until they reach 165°F (74°C).
Common mistakes
- Using the wrong flour. Cornmeal and masa harina are not masarepa. Check that the bag says pre-cooked corn flour for arepas, or the dough will be crumbly and the flavor will be off.
- Skipping the rest. Fresh dough feels loose and cracks as you shape it. A 5 to 10 minute rest lets the flour absorb the water so the dough turns smooth and easy to form.
- Making the dough too dry. A dry dough gives cracked edges and a dry, chalky inside. It should hold a ball without splitting. Add warm water 1 tablespoon at a time until the cracks disappear.
- Cooking only on the griddle. A thick cake can look brown outside and stay doughy in the middle. The oven step cooks the center through, so do not skip it.
- Using too much heat. A very hot pan darkens the crust in a minute while the center stays raw. Keep the pan at medium heat and look for pale gold with brown spots.
Frequently asked questions
What is the difference between masarepa and masa harina?
Masarepa is corn that was cooked in water, dried and ground, and it is not nixtamalized. Masa harina is dried flour from nixtamalized corn, used for tortillas. They are not interchangeable. Use masarepa for arepas.
Can I use regular cornmeal?
No. Raw cornmeal does not form a dough with water alone, and the cakes fall apart. You need a pre-cooked corn flour labeled for arepas.
Are arepas gluten-free?
Corn flour has no wheat, but cross-contact can happen in factories and kitchens. If you need to avoid gluten strictly, check the package label and use clean pans and tools.
How do I know the dough has enough water?
Roll a small piece into a ball and press it flat. If the edge cracks deeply, add water. If it sticks to your palm, add a spoonful of masarepa.
Can I make the dough ahead?
Yes. Wrap it tightly and refrigerate for up to a day. It firms up in the cold, so knead in a little warm water before shaping.