European Classics & Core Techniques
No-Knead Bread: A Crusty Loaf Baked in a Dutch Oven
A wet dough rests overnight with almost no yeast, then bakes in a hot covered pot into a loaf with a crackling crust and open crumb.
By Lavin Food Editorial · Published
- Prep
- 25 min
- Cook
- 55 min
- Total
- 1 hr 20 min
- Yield
- 8 servings
About this dish
No-knead bread is a way of baking in which a very long rise does the work that kneading usually does. According to Wikipedia, the method uses a very wet dough and very little yeast. During a rest of 12 hours or more, the gluten, the protein network that gives bread its chew, forms on its own. Some versions bake the loaf in a Dutch oven, which helps the crust.
The idea is older than its recent fame. Wikipedia notes written references as far back as The Compleat Housewife by Eliza Smith in 1739. The version most home cooks know is the one baker Jim Lahey developed, which Mark Bittman described in his New York Times column on November 8, 2006, according to the same article. Because earlier history is often overlooked, this page does not call the method new.
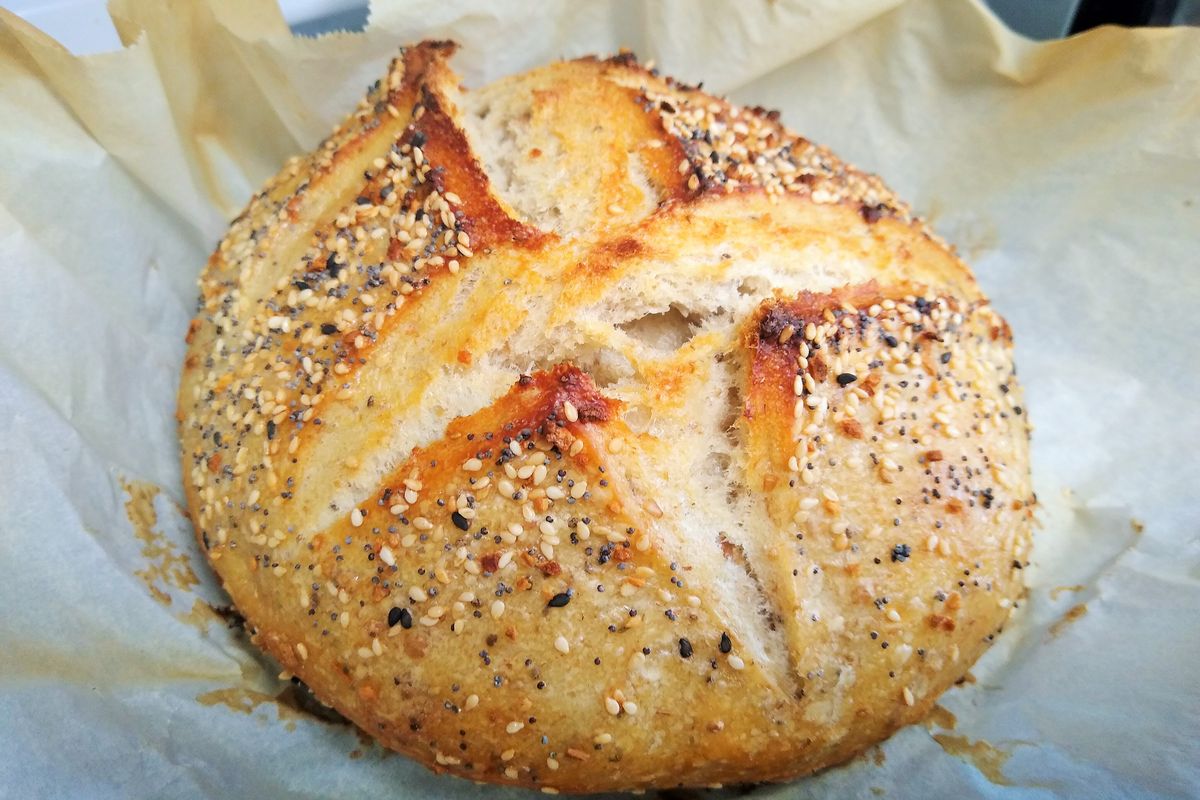
This recipe makes one round loaf with a thick, crackling crust and a chewy, open crumb. Most of the time is waiting, and the waiting is where the flavor comes from.
Ingredients and substitutions
Quantities are for 8 servings.
For the dough
- 3 cups (400 g) bread flour, or all-purpose flour, weighed if you can
- 1¼ cups (300 ml) water, cool, at room temperature
- 1¼ teaspoons (8 g) fine salt
- ¼ teaspoon (1 g) instant yeast
- 1 teaspoon (5 ml) neutral oil, for greasing the bowl, optional
For shaping and baking
- ¼ cup (30 g) all-purpose flour, for dusting the counter and dough
- 2 tablespoons (16 g) cornmeal or wheat bran, optional, for the resting surface
- parchment paper, optional, one large sheet
- Dutch oven, 5 to 6 quarts (4.7 to 5.7 L), with a tight lid
Choosing your ingredients
Weigh the flour if you own a scale. A cup of flour can weigh anywhere from 110 to 150 grams depending on how it is scooped, and this dough is wet enough that the difference matters. The cup measures here assume 120 grams per cup.
Hydration is the weight of water compared with the weight of flour. Here it is 300 grams of water to 400 grams of flour, or 75 percent, which is why the dough looks sticky and shapeless. Wikipedia notes that wet doughs call for more salt than usual, about 2 percent of the flour weight, which is the 8 grams used here.
Bread flour has more protein than all-purpose flour, so it gives a chewier crumb. The tiny amount of yeast is on purpose, because a slow rise builds flavor.
Use a heavy pot with a tight lid that can take 450°F (230°C). The lid holds in steam from the dough, so the crust stays thin and crisp. Some plastic or wooden knobs melt in a hot oven, so check the maker's limit.
Possible substitutions
- Bread flour: The same weight of all-purpose flour. The loaf will be a little softer and flatter.
- Instant yeast: The same amount of active dry yeast, stirred into the water first and left for 5 minutes.
- Part of the flour: Replace up to 1/2 cup (60 g) with whole wheat or rye flour, and add 1 tablespoon (15 ml) more water.
- Parchment paper: Skip it. Rest the dough on a towel dusted with cornmeal and tip it carefully into the hot pot.
- Dutch oven: Any heavy oven-safe pot with a lid and metal handles, or a covered clay baker.
Step-by-step method
- Mix the dough. In a large bowl, stir together the flour, salt and yeast. Pour in the water and mix with a spatula for 1 to 2 minutes, until no dry flour remains. The dough will look rough, sticky and shaggy, and that is correct. Do not knead it. Lightly oil the bowl if you like, then cover tightly with plastic wrap.
- Let it rest 12 to 18 hours. Leave the bowl on the counter for 12 to 18 hours. The dough is ready when it has more than doubled, the surface is covered in bubbles and it looks stringy when you pull a corner. Time depends on room temperature: check at 10 hours in a warm kitchen, and allow up to 20 hours in a cool one.
- Fold and shape the dough. Dust the counter with flour and scrape the dough out in one piece. Fold the edges toward the center four times, once from each side, working gently to keep the bubbles. Flip it seam side down and tuck it into a rough ball. This takes about 2 minutes, and the ball should feel soft and slightly tacky.
- Rest the shaped loaf. Set the ball seam side down on parchment, or on a towel dusted with cornmeal. Cover loosely and let it rise for 1 to 2 hours. It is ready when it looks puffy and springs back slowly when pressed with a floured finger.
- Heat the pot. About 45 minutes before the rest ends, put the empty Dutch oven with its lid on a rack in the lower third of the oven. Heat to 450°F (230°C) and let the pot soak up heat for at least 30 minutes. A very hot pot helps the dough rise and brown. Open the oven with care.
- Load the dough and bake covered. Wearing thick, dry oven mitts, set the pot on a heat-safe surface and remove the lid. Lower the dough in, using the parchment as a sling. Cover and return the pot to the oven. Bake for 30 minutes without peeking, while trapped steam lets the loaf swell fully.
- Bake uncovered until deep brown. Lift off the lid, keeping it away from your face, and bake for 15 to 30 more minutes. The loaf is done when the crust is deep brown, not just golden, and it sounds hollow when tapped on the bottom. An instant-read thermometer should show about 205 to 210°F (96 to 99°C) in the center. Lift the loaf out with the parchment.
- Cool completely on a rack. Move the loaf to a wire rack and let it cool for at least 1 hour. You may hear small crackling sounds as the crust cools. Do not slice it hot, because the inside is still setting and a hot loaf cuts into a gummy crumb.
Variations
For a seeded loaf, fold 1/4 cup (35 g) of sesame, sunflower or pumpkin seeds into the dough during shaping and press a few more onto the top. For a savory loaf, add 1/2 cup (50 g) of grated hard cheese and 1 teaspoon of dried rosemary or thyme with the flour.
For a deeper flavor, put the covered dough in the refrigerator after mixing for up to 3 days. Wikipedia notes that a cold rise can run for days. Let the bowl warm up for 1 to 2 hours, then fold, shape and bake as written.
Storage and reheating
Keep the cooled loaf cut side down on a board, or in a paper bag, at room temperature for up to 2 days. The refrigerator makes bread go stale faster, so avoid it. Discard bread that shows mold.
For longer storage, slice the cooled loaf and freeze the slices in a freezer bag for about 3 months for best quality. Toast slices straight from the freezer. To refresh a day-old loaf, warm it on a rack at 375°F (190°C) for 8 to 10 minutes, until the crust crackles again.
Common mistakes
- Skipping the long rest. A dough rested for only 4 or 5 hours bakes up dense and bland. Wait for doubled size and a bubbly surface, not just the clock.
- Using a pot that is not hot enough. A cold pot gives a pale, flat loaf. Heat the pot with its lid for a full 30 minutes at 450°F (230°C) before the dough goes in.
- Cutting into the loaf too soon. Slicing a hot loaf lets steam escape and leaves the crumb gummy. Wait at least 1 hour.
- Adding extra flour. The dough is meant to be sticky. Working in more flour makes a tighter, drier loaf. Use only a light dusting.
- Pulling the loaf out too early. A pale crust means thin flavor and a damp inside. Bake until the crust is deep brown and the center reads about 205 to 210°F (96 to 99°C).
Frequently asked questions
Why does the dough rise so long?
Time replaces effort. During the rest, the flour absorbs the water and the gluten strands line up on their own, which is what kneading would otherwise do. A warm kitchen may finish in 12 hours, a cool one in 18 or more.
Do I really need a Dutch oven?
It gives the best crust, but any heavy covered pot that can take 450°F (230°C) works.
Can I use all-purpose flour?
Yes. The loaf will be a little softer and less tall, but still crusty. If the dough seems very loose, use 2 tablespoons (30 ml) less water.
How do I avoid burns from the hot pot?
Use thick, dry oven mitts. The handles and lid knob reach oven temperature too. Lift the lid away from your face because steam escapes fast, and set the hot pot on a trivet. Warn others in the kitchen.